Sharing the love of food and trying new recipes...

Friday, December 25, 2015

Festive coconut cakes (kokostoppar)


Coconut cakes, or kokostoppar or kokoskakor in Sweden, are festive small cakes that I usually make for Christmas. They're super easy to make and take very little time to prepare. In almost 30 min you could have them done!
They're great as small dessert with coffee or tea, and taste great :-) They're crunchy outside and soft inside.

Merry Christmas!

Recipe for about 30 coconut cakes

50 g butter
2 eggs
1 dl sugar
200 g shredded coconut

Melt butter.
In a bowl mix eggs and sugar.
Add coconut, mix and then add melted butter, and mix.
Let the mix sit for about 15 min so the coconut swells a bit.
Place parchment paper on an oven plate.
Make small cakes of the coconut mix with 2 spoons (they're meant to be eaten as bites).
Bake in the oven 10 min at 175 C.
Make sure the cakes are detached from the parchment paper before they cool down.

Wednesday, December 23, 2015

Julgröt for Swedish Christmas breakfast


Swedish Christmas starts with Julgröt in the morning. Julgröt, also called risgrynsgröt, is a classical rice pudding made with milk, sugar, and cinnamon. You can eat it cold or warm, with or without milk, but for sure with cinnamon on top.

I like to make a lot of it so I can have some every morning and every afternoon before and after Christmas :-) In any case, it's a very easy recipe, and it takes a bit of time to prepare. But for the last 40min of cooking you can also turn off the fire and leave the rice in the pot on its own and do something else in the meanwhile. So it really requires only about 30 min of attention.

God Jul!

Recipe for 8 portions of Julgröt:

6 dl water
1 tsp salt
2 tbsp butter
3 dl round rice
1.4 l milk
2 sticks of cinnamon
3-4 tbsp sugar

Bring water, salt, and butter to a boil. Add rice and cinnamon, bring to a boil again and then lower the heat. Let cook for 10 min with lid on.
Add milk and bring to a boil again (mid temperature). *Then lower the temperature to the lowest possible and let it cook (lid on) for about 30-40 min. Don't lift the lid at the beginning.
Towards the end you can mix a bit with a wooden spoon and add sugar to your taste as well.
Serve with some cinnamon on top and some milk as well!

*At this point, you could also turn off the heat and leave your rice to cook slowly for about 45 min.

Saturday, November 28, 2015

Classic Tiramisù


Tiramisù is one of my absolute favorite desserts. I actually make it quite often and meant to post the recipe a long time ago but I was never quite satisfied with my pictures. This week I made a big Tiramisù for Thanksgiving so I thought it was a good opportunity. Plus Tiramisù makes for a great Holiday dessert to share with friends and family.

Tiramisù is composed of a mascarpone cream (mascarpone, fresh eggs, and sugar) layered with coffee-dipped ladyfingers and chocolate. You can make a number of variations around this recipe, including skipping egg whites if you want your cream heavier and more mascarpone heavy, swapping ladyfingers for another kind of biscuit of your choice (ginger snaps, petit beurre, digestive) or skipping them altogether, and you can also sprinkle the cream with the kind of chocolate you like and also include nuts if you like.

Recipe for a big Tiramisù

900 g mascarpone, room T
9 tbsp sugar (generous)
9 eggs, whites and yolks separated
400 g ladyfingers (savoiardi)
2 mugs of coffee
200 g dark chocolate
powder cocoa
*optional: 2 handfuls of roasted pine nuts

Cream preparation
In a clean bowl beat up the eggwhites until stiff and towards the end add a pinch of sugar to finish off beating. It is important that there is no fat or any eggyolk in the eggwhites.
In another bowl beat up sugar and eggyolks until light and fluffy. Add the mascarpone and beat until incorporated.
Carefully incorporate the eggwhites into the mascarpone cream: the obtained cream should be homogenous and light.

Layering
Dip the ladyfingers one after the other and place them tighly together in a dish. The ladyfingers have to be soaked with coffee and place them with the sugar crust facing down.
Cover the ladyfingers with have of the mascarpone cream.
Sprinkle with powder cocoa and chopped chocolate.
Repeat the above steps for the second layer.
Here I replaced the chopped chocolate with roasted pine nuts for the second layer.
Refrigerate for at least 3 hours (overnight is better) before serving.
I recommend eating it within 2 days.

Monday, October 26, 2015

Zucchini bread with nuts and raisins


This Summer I made zucchini bread. I'm not sure it qualifies as "bread" per se given the amount of sugar in it but I guess it's just like banana bread and pumpkin bread which are called bread to make people think they're eating bread when they're actually having cake :-)

This zucchini bread has lots of fresh zucchini, hence the green color, raisins and nuts. It makes for a great snack or breakfast. If you've never had it - if you live in Europe probably you haven't - you should try: it tastes great and has lots of good stuff in it! Plus it's super easy to make and you can freeze it down if you want to keep a portion for another time.

Recipe for a 28 cm-long bread

2 eggs
1.6 dl colza oil
2.8 dl sugar
3.2 dl zucchini, shredded
4.8 dl flour
2/3 tsp baking soda
1/2 tsp baking powder
1/2 tsp salt
1 dl dark raisins
1.5 dl chopped pecans/walnuts

Beat eggs in a bowl. Add oil and sugar, mix.
Add the shredded zucchini and mix.
In another bowl mix flour, salt, baking powder and soda, nuts and raisins.
Add dry ingredients to wet ingredients and mix.
Transfer the batter to a greased and floured cake/loaf pan.
Bake at 175C for 55-60 min (until a toothpick comes out clean).

Friday, August 28, 2015

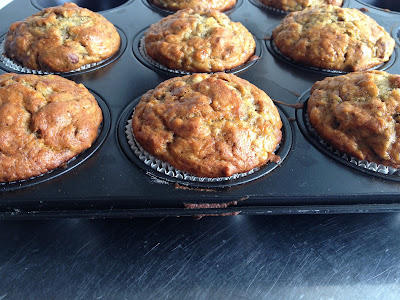
Banana-nut muffins


Sometimes I bake because I want to and sometime because I need to. Last weekend I baked because I had to. I had no food in the fridge for breakfast and I was too lazy to go to the grocery store. I took a brief look at my kitchen and fridge and found some old bananas. So I set to make banana-nut muffins for breakfast. I really like them, they're super easy to make, and all you need to make sure of is to have overly ripe bananas. I included toasted pecan nuts in them, but you can also use walnuts or peanuts, or skip them entirely.

They're great for breakfast or as snack during the day. You can keep them for a few days and I would recommend storing them in a ziplock bag to make sure they don't dry. I also froze them down and ate them a week later, and they were still moist and excellent. Try them !

Recipe for 12 banana-nut muffins

3.6 dl flour
1.5 tsp baking soda
a pinch of salt
1 egg, beaten
4 very ripe bananas, mashed
1.2 dl sugar
0.6 dl brown sugar
1.2 dl melted butter
1 tsp vanilla extract
3 dl pecan nuts, toasted and chopped

In a bowl mix flour, baking soda and salt.
In another bowl mix mashed bananas, sugar, egg, butter and vanilla extract.
Add the flour mix and mix until just incorporated.
Finally add the chopped pecan nuts.
Divide into 12 muffin forms in a muffin pan and bake 20-25 min at 175C.

Friday, August 21, 2015

Classic apple tart with apple compote


Last week was my birthday so I wanted to celebrate it with a big apple tart. I have often made simple apple tarts but I sometimes find them too dry. This recipe here is composed of a nice pie crust, covered with a homemade apple compote, topped with a geometrical layer of thin apple slices, the whole thing finally glazed with quince jelly to add a shiny touch. This tart almost looks like it comes from a bakery shop :-)

The apple tart is easy to make and you can also prepare certain parts ahead of time: the dough can be stored in the fridge for several hours or even days and the apple compote as well. Also, if you are worried your compote is too "wet", you can pre-bake your pie crust 7-8 min in the oven before spreading the compote and placing your apples. The only challenge here is to slice the apples thinly and to place them tightly enough on the compote. Try it, I really liked it!

Recipe for a big apple tart:

Pâte brisée (dough)
250 g flour
130 g butter
30 g sugar
1 pinch of salt
1 eggyolk
some water (2 tbsp)

Apple compote
600 g apples (about 4 apples)
1-1.5 dl sugar
a few drops of lemon
some cinnamon
some water

Garnishing
700 g apples (4-5 apples)
some sugar
some quince or apricot jelly

First prepare the dough (pâte brisée). In a bowl mix flour, sugar and salt. Add cold butter pieces and mix with your hands making crumbs. Add the eggyolk plus some water and mix into a stiff dough. Cover it with plastic wrap and refrigerate.

Peel all apples and sprinkle some lemon on them to prevent oxidation.

Cut up 600 g of apples in big pieces and place in a sauce pan, along with sugar, cinnamon and some water. Adjust sugar and cinnamon to your taste. Heat up and let apples cook under lock for about 15-20 min. When apples are well cooked, remove the lid, crush and mix the apples with a wooden spoon, mixing until the compote/purée has "dried" (no water left). You want your compote to be quite dry so it doesn't wet your dough. Let it cool down.

Slice thinly in quarters the remaining apples.
Grease and flour a tart pan.
Take out the dough from the fridge and roll it out onto a floured table. Transfer to the tart pan and prick it with a fork.
Spread the apple compote on the dough and then place the thin apple slices tightly together in a geometrical pattern (make it tight because apples shrink while baking).
Sprinkle some sugar on top and bake in the oven at 200 C for about 35-40 min.

Wednesday, July 29, 2015

No-bake, passion fruit cheesecake


When I arrived in Sweden last week I found about 2 kg of ripe passion fruit in the fridge. I remembered a nice cheesecake with passion fruit coulis that I had tasted a while ago. Since I had no eggs in the fridge I set to come up with a cheesecake recipe without eggs and that required no baking. I have already tested and posted the classic cheesecake recipe (which requires about 1 hr of baking) so this one is quite different in that it takes a lot less time to prepare and is a bit lighter and fluffier.

The passion fruit coulis is great with this no-bake cheesecake and you can also top the classic cheesecake or panna cotta with it too. The cornstarch will enable the coulis to thicken a bit and stay on top of the cheesecake when slicing, but if you like your fruit coulis more fluid you can skip the cornstarch. I also used the leftover passion fruit coulis in my breakfast the next day it was great :-)

In any case, try this no-bake cheesecake recipe, I really like it and makes for a nice dessert in Summer!

Recipe for a 24 cm springform cake

Base:
250 g digestive biscuits
150 g melted butter

Filling:
600 g cream cheese, room T
150 g sugar (1.5 dl)
1 vanilla pod
2-3 tbsp passion fruit juice
2 tbsp water
3 leaves gelatin
3 dl liquid cream, whipped

Topping:
200 g passion fruit pulp
1 tbsp maizena (corn starch)
1 dl water
60 g sugar

Crush finely the digestive biscuits, add melted butter and mix a bit with a spoon. Grease a spring form and cover the base and sides of it with the biscuit mixture. Refrigerate for at least 10 min (leave it in the fridge until you need it).

In a bowl whip cream cheese (it has to be at room T), sugar and seeds from a vanilla pod.
In a small saucepan, heat up a bit the water and passion fruit juice. Add pre-wetted gelatin sheets and swirl until melted.
Add melted gelatin to cream cheese mix while mixing. Finally fold in the whipped cream.
Transfer the cream to the spring form and even out the surface. Cover and refrigerate for at least 3 hours (overnight is better).

Place sugar and passion fruit pulp in a saucepan. Mix maizena and water in a bowl and add to the fruit. Heat up while stirring (don't stop) on medium heat and stir for about 3-4 min until thickened. Let the fruit cool down and then transfer on top of the cake. Refrigerate for another 2 hrs.

Sunday, July 19, 2015

Rhubarb cobbler


A few days ago my friend Scott brought be a raspberry cobbler. I didn't know what a cobbler was beyond its shoe-mender definition. But I loved the cake. It was moist, sweet, a bit bready, and full of fruits. Since I had a lot of rhubarb at home I decided to try and make a rhubarb cobbler and it came out great. You can eat it straight out of the pan with a spoon but I recommend serving it lukewarm with a scoop of vanilla ice-cream, it's just perfect :-)

Recipe of the rhubarb cobbler (small pyrex dish)

2.4 dl milk
2.4 dl flour
2.4 dl sugar
5 dl rhubarb cut in 2cm-pieces
1.5 tsp baking powder
0.6 dl melted butter (4 tbsp)

extra: some more sugar for sprinkling

Whisk sugar, flour, baking powder and milk in a bowl. Add melted butter and mix.
Grease a pyrex dish with butter. Pour half of the batter, add half of the fruit, then pour the remaining batter and sprinkle the remaining fruit pressing them in a bit.
Sprinkle 2 tbsp sugar on top and bake approximately 50 min at 175 C. Then sprinkle another 2 tbsp of sugar and bake for another 10 min.

Let it cool down a bit and serve lukewarm as is or with some whipped cream, double cream, or vanilla ice-cream.

Wednesday, May 27, 2015

Rhubarb crumble


Spring is rhubarb season and I love it! Rhubarb is both sweet and sour and makes for nice summery desserts, like rhubarb pie, rhubarb walnut muffins, and rhubarb almond cake. Since a few years now, I make rhubarb crumble, with rhubarb from my parents garden :-), but I never posted the recipe, simply because I couldn't manage to make nice pics of it. I'm still not very satisfied with these pics but I'd like to share the recipe.

This crumble is based on butter, sugar, and flour, like most crumbles, and it also includes pecan nuts, cinnamon, and oats to add some extra crunchy and taste to it. If you have guests over, you can bake it during dinner and serve it (luke)warm with some vanilla ice-cream, like the one from my favorite ice-cream shop in Lausanne, it will taste great!

Rhubarb crumble (for a 20x30 cm dish)

0.5 kg rhubarb, peeled and cut in pieces
2 tbsp white sugar
a few drops of lemon juice
1/2 tsp lemon zest

For the crumble:

3 tbsp (45 g) butter
0.9 dl brown sugar
0.6 dl flour
1/2 tsp cinnamon
a pinch of salt
0.6 dl oats
0.6 dl chopped pecan nuts

In a bowl mix rhubarb pieces, sugar, and lemon; set aside.
In another bowl, mix brown sugar, flour, cinnamon, salt and butter by hand. Add oats and nuts and mix.
Generously butter a baking pan. Add rhubarb pieces (without the juice that came out while sitting) and cover with the crumble mix.
Bake in the oven 45-50 min at 180 C until crunchy and golden.
Let it cool down a bit and serve with vanilla ice cream. Enjoy!

Friday, May 22, 2015

Lemon and blueberry yoghurt cake


In Summer it's nice to eat refreshing desserts, like sorbets, fruity mousses, and fruit cakes with a nice lemonade or ice-tea. It's not quite Summer yet but I felt like making one of those fruit cakes for my friends last week. I came across a lemon blueberry cake which I modified a bit and liked a lot.

The base of the cake is a yoghurt and lemon dough to which you add a lot of fresh blueberries and that you finally cover with a wonderful, sweet lemon glaze. It takes less than 10 min to mix the ingredients and you can easily store it in the freezer. If you're looking for an easy good cake to eat for coffee or for breakfast I recommend you try this recipe!

Recipe for a 30 cm-long cake

4.8 dl flour
2 tsp baking powder
1/2 tsp salt
1.2 dl colza oil
2 tsp vanilla extract
2 eggs
2.4 dl sugar
2.4 dl plain yoghurt
1 lemon, juice + zest
3 dl fresh blueberries

Icing:
1.8 dl powder sugar
2 tbsp lemon juice

In a bowl mix flour, baking powder, salt. In another bigger bowl, whisk together all wet ingredients and sugar. Add dry ingredients to wet ingredients and mix until just incorporated (don't overmix). Finally incorporate blueberries in dough.
Transfer to a greased + floured cake pan. Bake 55-60 min at 175C until done. Let the cake cool down a bit and then remove it from the pan.

Once the cake is cool, prepare the icing. Mix powder sugar with lemon juice to obtain a viscous mix (you may need to add a few more drops). Drizzle the glaze on top of the cake with a spoon and wait a bit for it to harden before serving.

Sunday, May 17, 2015

Orange blossom, vanilla and pistachio cake


When I was on holidays in the Middle East, I indulged in a lot of pistachio and orange blossom-based desserts, I love pistachios and orange blossom water. Even when I go to my favorite local gelato shop in Lausanne, I most often pick pistachio and orange blossom flavored ice-cream. Since I like cake very much, I went on to look for and adapt a nice recipe cake that included these ingredients.

This cake has refined flavors, is moist like I like them, and quick and easy to make. It's a great cake to have for an afternoon cake or for dessert with friends as it is very nice looking and colorful. If you like dry cakes with which you can choke this cake is not for you. If you however love moist, juicy, sweet cakes, then try it, it's for you !!!

Recipe for a 24 cm-spring form:

200 g flour
100 g peeled and ground almonds
150 g sugar
1 tsp baking soda
2.5 dl plain yoghurt
1.5 dl colza oil
3 eggs
2 vanilla beans (seeds)

Syrup:
2.5 dl water
2.5 dl sugar
2 vanilla beans (pods)
2 tbsp orange blossom water
a handful of pistachios

Mix all dry ingredients (flour, almonds, sugar, baking soda) in a bowl.
In another bowl whisk together yoghurt, oil, eggs and vanilla seeds.
Add wet ingredients to dry ingredients and mix. Transfer the dough to a greased and floured spring form and bake in the oven 35-40 min.

When the cake is done, prepare the syrup. Place water, sugar and vanilla pods in a saucepan. Heat up to allow the sugar to melt and then bring to a boil and let simmer until the volume has reduced by one third. Take out the vanilla pods, let the syrup cool down a bit and then add the orange blossom water to it. Unmold the cake and poke holes with a toothpick on the surface of the cake. Pour the syrup evenly on the surface of the cake and decorate with some hacked pistachios.

Wednesday, April 29, 2015

Focaccia alla genovese


Focaccia is a wonderful, classic Italian bread eaten for breakfast and as snack.  It's moist and chewy, flavored with olive oil and rosemary, smells great and tastes even better. And the big sea salt adds a crunchy side to it that I love.

Focaccia is very easy to make but takes a lot of timing because of all the leavening times. But be patient it's worth it. Try it for yourself!

Recipe for an oven plate-sized focaccia

600 g flour
0.5 dl olive oil
7 g dried yeast (or 25 g fresh yeast)
15 g salt
2 tsp sugar
3.5 dl water (tepid)

Topping:
rosemary
70 g water (tepid)
70 g olive oil
big sea salt

In a big bowl dissolve the yeast with some tepid water. Add the remaining water, olive oil, salt, sugar, and almost all flour. Mix with a wooden spoon and finally work it on a floured table until obtaining a soft dough. Let it leaven for 30 min under a cloth.

Cover an oven plate with olive oil transfer the dough there and flatten it with your hands and with a rolling pin, gently so as not to break up air bubbles too much. Pain the surface with some olive oil and let it leaven for another hour under cloth.

Mix oil, water and salt in a bowl making an emulsion. Make deep holes in the dough with your fingers and cover the dough with your oil emulsion (all of it), the holes should be full of oil now. Sprinkle some rosemary on top and let it sit for another 20 min.

Bake in the oven approx. 20 min at 200 C until golden. Enjoy it warm right away or cold for a later snack!


Monday, April 20, 2015

Eclairs au chocolat, basic and delicious


Eclairs au chocolat are one of my favorite desserts in the category "I cannot make them and have to buy them". I only like the éclairs filled with chocolate pastry cream and I have tried many in Lausanne's bakery shops and abroad - in the US I stopped trying them after finding out that they were often filled with custard or whipped cream, I felt too deceived :-)

After taking the pastry course at Benoit Violier I had decided to practice and replicate what I had learned there, among other things pâte à choux. This weekend I finally went on to try and make this and fill my little choux with chocolate cream to obtain éclairs au chocolat. It was my first time using a piping bag, my first time making pâte à choux (which is unlike other doughs more tricky), and my first time making chocolate cream... I failed a few things on the first round, like making my choux fall after rising, undercooking them, and burning my chocolate cream. But in the second round, I succeeded and made excellent éclairs (and mini-éclairs) au chocolat that disappeared within 10 minutes :-p

Eclairs au chocolat, a French dessert par excellence, can be made within 1 hour if you are well organized. Don't be discouraged by the number of steps in the recipe, every component can be made quite quickly, and the reward at the end is totally worth the effort. Enjoy!

Recipe for many éclairs au chocolat (12 big ones)

Pâte à choux (choux pastry dough)

1.25 dl milk
1.25 dl water
2.5 g salt
5 g sugar
112.5 g butter
137.5 g flour
5 eggs, room T

In a saucepan heat up milk, water, salt, sugar and butter. When butter is melted bring to a boil and remove from the heat. Add flour all at once and mix fast with a wooden spoon. Put back on the fire and continue mixing until the dough is compact and detaches from the sides (this step is to dry or dehydrate the dough).

Transfer dough to a cold bowl and wait 5 min for the dough to cool down a bit. Add eggs one by one, mixing vigorously in between each with a wooden spoon.

Transfer dough to a piping/pastry bag with a round nozzle and lay down éclairs or puffs (as you prefer) on an oven plate lined with parchment paper. For éclairs I suggest making 3 x 10 cm shapes and for puffs something around 3-5 cm.

Bake in the oven 25-30 min at 180 C, until golden brown.


Chocolate pastry cream

30 g corn starch (maizena)
40 g powder sugar
4 dl milk
4 egg yolks
40 g powder sugar
200 g dark chocolate

Chop up or grate chocolate and transfer to a bowl.
Beat up egg yolks and powder sugar until whitish and fluffy. In a saucepan heat up milk, corn starch and powder sugar while mixing with a whisk. Bring it to a boil and then remove from heat. Add some of the milk mix to the egg mix and whisk. Add back to the sauce pan and put back on the fire. Whisk and bring to a boil. Remove from the heat and pour on top of the chocolate in a bowl. Mix until the chocolate is melted. Cover the cream with plastic foil and refrigerate for 20 min.

Poke a hole in the puffs or 2 wholes in the éclairs (on the bottom surface). Transfer the pastry cream to a piping bag with a small nozzle and fill the puffs/éclairs via the hole(s) you just made.

Chocolate icing

75 g dark chocolate
75 g liquid cream

Heat up the cream and add to the chocolate. Mix until the chocolate has melted. Dip the upper surface of the éclairs in the glacage and let it dry. Now you can enjoy your éclair au chocolat!

Saturday, March 28, 2015

Laura's Gourmandises on Amazon!

Laura's Gourmandises just got published on Createspace and you can find it on Amazon as well!

http://www.amazon.com/Lauras-Gourmandises-Laura-Jeanbart/dp/1500889717/ref=sr_1_1?ie=UTF8&qid=1427561494&sr=8-1&keywords=laura+jeanbart

In this first recipe book, I put together my favorite recipes posted on this blog in 2013 and improved the text and images. The book is available as hard copy or as Kindle edition and you can find it here.

If you like it, share the word!
And stay tuned for a second book with recipes from 2014!


Saturday, March 21, 2015

Moist pistachio cake with glazed Bronte pistachios


A few months ago I went to Sicily, where I discovered cannoli, ricotta, granita, but also pistachios from Bronte. Bronte is a tiny village on the southwest slopes of the Etna volcano and is known for its green pistachios. Because they're so good, they're used in almost every dessert in Sicily :-)

Before leaving, I bought a kilo of Bronte pistachios to bring back home for baking. This week I finally used them and made a pistachio cake which was moist and rich in pistachio flavor, with ground pistachios in the cake and glazed pistachios as "icing". The cake is wonderful, I highly recommend you try it if you like pistachios. Enjoy!

Recipe for a 30 cm-long pistachio cake:

For the cake:
250 g butter, room T
200 g sugar
4 eggs
100 g Bronte pistachios*
100 g blanched + ground almonds**
65 g flour
1/2 tsp baking powder

For the glaze:
1 dl water
1 dl powder sugar
50 g pistachios


Grind pistachios finely (use a mixer if you have one, I did it by hand with a knife).
Cream butter and sugar (whip them together). Add eggs one by one, whipping in between each egg to make sure each egg gets incorporated. Add ground almonds, ground pistachios, flour and baking powder, incorporate gently and do not overmix. Transfer dough to a buttered and floured cake pan (30 cm long) and bake in the oven 45 min at 175 C. Let the cake cool down for a few minutes and then flip it upside down.


Once the cake is cool, put powder sugar and water in a saucepan. Bring it to a boil, let some water evaporate to obtain a syrup and then turn off the heat. Add pistachios and swirl a bit. Decorate the pistachio cake with the glazed pistachios and the syrup.

*I kept the thin red skin on the pistachios, but if you want and have the energy you can peel them; also pistachios used her don't have to come from Bronte, they just taste better and sound fancier :-)
** if you want a finer cake you can use almond meal/flour instead of ground almonds